Wave the mouse over the buttons above and see what happens!
This applet was rated "cool" and a "cut-above" by Gamelan...
Magic
Buttons
Free to non-commercial users? Yes - sure is! A version with most of the features
is available entirely free for you to use for as long as you like without ever
getting a bad conscience! For a small payment you get even more: a
keycode which activates extra features. (Details below). Commercial users must
buy a keycode before using this applet.
Features
Create buttons from any graphic you like!
Arrange them in a grid, vertical line or horizontal line
4 different cool animating effects in response to mouse movements!
Press-in option available (click on a button, and design your effect)
Control speed of animation transitions
Text fades gently between colours to accompany transitions
Text can be wrapped over 2 lines (keycode version only)
Button clicks load pages into whatever frame you specify
Status window display can be defined for each button
Two sounds: one for mouse movement, one for clicking (keycode version only)
Animation effects
Move the mouse over the buttons to try out the animations. Numerous
animation parameters can be changed to adjust the effects (e.g. speed).
Basically you draw the start and finish states, and the applet works
out the additional frames for the transition.
Circular expand/shrink
Rectangular expand/shrink
Fade
Fizzle
Push-in effects
Click on a button to try it out. All effects are created by graphics, so
you can invent your own as well.
3D-button squash
Button moves closer to its shadow
3D-rectangle flatten
Traditional shadow inversion
Freeware / Shareware: how it works
You can
download
this applet from our site and use it free of charge if you are a
private non-commercial user (see the
licence agreement
for an exact definition of
commercial). However the free version has the following restrictions:
A random button links back to us (it doesn't overwrite any of your
buttons; it just pushes them along); the button is marked "free buttons" -
i.e. we kept our name off it because we think that's too intrusive and
we'd like you to be able to use this without having our name sprawled
all over your site.
There are a maximum of 5 rows and 5 columns (i.e. max 25 buttons).
There is no text wrapping and the text positioning parameters are
deactivated (i.e. you are restricted to one line centered on the button).
There are slight (but probably unnoticeable) restrictions on button sizes.
If you purchase a keycode these limitations are removed. We have tried to strike
a balance here between offering a good freebie and financing our future
applet development. On the one hand
we would like to offer something cool to those who
can't afford to pay. On the other hand, if we make some money out of this
arrangement, you can bet that we will be back with lots more semi-freebies
offered on the same basis - and that's in your interest! You can try out
the keycode effect offline by entering the parameter
<param name=keycode value="xyz">
This allows you to try before you buy. Note that the "xyz" keycode won't work if you
upload the applet - it'll only work offline.
Keycodes are unique to any particular
location - effectively you are buying a location licence for the applet. When
you order a keycode you have to give us the URL of the site where you are
using the applet. If you'd like a keycode, the price is 15 pounds (UK currency) for
each keycode,
and you need to go to our
ordering page
to see about how to order it. You can order directly over the internet if
you wish, and dollar payment is also available.
Downloading it from our site
Don't try downloading any of the demos - they won't work elsewhere. Please go
to our official
downloads area
where you will find a special download package
with lots of extra goodies in it. You'll have to register to use the downloads
area, but registration is free and fast. At the moment the download is officially
a "beta" version (i.e. it might not always work correctly), but you can come
back any time and upgrade. Same goes if you buy a keycode now - you can come
back any time and upgrade - the keycode will be valid for your upgrade too!
You may not download unless you read the
licence agreement first.
Instructions
1. Inserting the applet into your code
The first thing you need to do is just copy the following into your
HTML. You should set the height and width to the actual values you
want your menu to have. The available space will be filled with as
many buttons as fit in - just make sure that the height and width you
type in are exact multiples of the pixel sizes of the button graphics.
Make sure you type in the copyright notice exactly (best thing: copy and paste
from here), because otherwise the applet won't work. No one will see the notice
unless they look at your HTML source code. After that you'll have to add in a few
more parameters before the </applet> tag - these are all explained below.
Just copy these things into your HTML and play around with the values.
2. Preparing the buttons
The buttons are created from simple GIF or JPG files, You just put these
files into the same directory as the applet, and it uses them just like that.
All you have to do is tell the applet what the name of the file is and how
big the buttons are, which you do as follows:
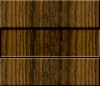
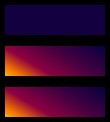
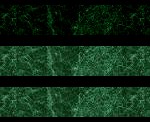
The graphics file itself is the arty bit. Here are some examples (all used in the
various demos up above):
The file actually contains three button states in a vertical line. The top
button is the normal state. The middle one is what it looks like when you
press it down. The bottom one is the focus or highlight state. The applet
creates animated states between the top and bottom images (the middle image
is irrelevant except when the button is held down). You don't have to worry
about drawing the animated states - that's what the applet does for you.
You can use any graphics for the button file - just be careful about sizes!
3. Doing the text and the links
There are four navigation-related functions that can be attached to each button.
The first is the text on the button, the second is the URL to be linked, the
third is the text to appear in the browser status window when the mouse moves
over the button, and the fourth is the frame into which the targeted URL will
be placed. The button numbering starts at 1, and for each set of four
parameters you should add the button number onto the end of the parameter
name.
<param name=linktext1 value="Sunset demo">
<param name=linkaddress1 value="ssmenu.htm">
<param name=linkmessage1 value="A great demonstration - don't miss it!">
<param name=linkframe1 value="_self">
<param name=linktext2 value="Asteroid demo">
<param name=linkaddress2 value="astmenu.htm">
<param name=linkmessage2 value="Another great demonstration - don't miss it!">
<param name=linkframe2 value="_self">
The address and frame values can be pretty well anything that is acceptable
in HTML, but note that some browsers do not support some of the more exotic
URL types when fed through an applet. If you want to save yourself some
typing, you can set a default frame for all the links and leave out the
"linkframe" parameter except for a few special buttons.
<param name=defaultframe value="main">
4. Formatting the text
The next thing is to make the text look nice. You can set the font, style,
size and colours as below. In java the only fonts available are Helvetica
and TimesRoman (spelt like that). If you want stylish fonts you'll have to
use a special work-around of ours, which we put into "Magic Buttons Plus".
The possible style values are 0 (normal), 1 (bold), 2 (italics), 3 (bold
italics). The first colour is the normal colour of the text. When the mouse
moves over a button, the second text colour is activated, and the applet
fades from one text colour to the other at the same speed as it changes
the button graphics. The third colour determines the text appearance
when the button is pressed down. The colour codes are hexadecimal - i.e. the same
things used by HTML.
The following parameters are additional non-essential text-formatting
commands which are available in the keycode version. By default the text
is centered exactly on the button. If you use non-symmetrical buttons,
you may need to shift the text up or down, or right- or left-align it.
The "textposition" parameter does the alignment (values are 0,1,2),
the "textYoffset" and "textXoffset" parameters shift the text vertically
on horizontally.
The final parameter above - "textmargin" - sets margins on both
side of the button over which the applet cannot write. This is useful
only when lines are wrapped over 2 lines. The applet automatically
wraps as necessary in th keycode version. To override the automatic
wrapping and force a line-break where you want one, use the paragraph
symbol (§) with a space before and after - this symbol should be written
into the "linktext" parameter which determines the text on the button.
5. Adjusting the animations
To maximize the aesthetic effect of individual graphics, various
animation parameters must be very carefully adjusted. Each time the mouse
moves over a button, an animation routine is triggered. First the button
animated towards a new state, then, when the mouse moves away, it animates
back to its original state. In most of the demos on this site, the
first of these two animations is actually reduced to a flash, or is so
fast that you probably won't notice it. The values that produce the best
effects vary greatly from one graphic to another. If your off-state and
on-states are very different in colour or brightness, for example, you will
need a high number of frames to smooth the effect. If they are very similar, you
will need a fast change if the site visitor is to notice it at all!
The "changetype" parameter has the value 0 (flash), 1 (rectangular expand),
2 (elliptical expand), 3 (fade), 4 (fizzle). "Changeframes" determines
how many frames the applet uses for the change. Increasing the number of
frames can make the animation smoother, but it will use more memory and
take more time (unless you change the speed parameters as well).
10 - 20 frames are recommended; you may have between 5 and 30.
"Changespeed" determines how many milliseconds the applet pauses between
each frame. Thus a high number slows down the animation. You may have
between 0 and 100 milliseconds; the default is 20. "Inspeed" determines
how fast the button changes to its new state when the mouse moves over
it. Effectively it is designed to speed up the change, and causes the
applet to jump frames. The value should be the number of frames to
jump; the default value is "all the frames" (a flash). "Outspeed"
determines the length of the lag the mouse leaves behind it. This
parameter is designed to slow down the frame changes back to the normal
state, and can have a value between 1 and 10, where 10 is a normal
frame rate (fast) and 1 is a slow frame rate.
6. Sound Effects
In the keycode version of the applet you may have sound as well.
To test keycode features before buying, enter a dummy keycode
while offline, and the keycode features will become available.
Two sounds may be assigned when you implement the applet: one activated whenever the mouse
moves over a new button; the other activated when the mouse clicks
on a button.
You can insert any .au format files here you wish. We recommend
that you use very small files to ensure fast download.
Remember that a 100 KB audio file may sound cool offline, but
when you upload your site visitor may have to wait half a century
to hear it. By small, we mean about 2KB or less. The "movesound"
should also be extremely short, otherwise the result is distasteful when
moving the mouse fast over the applet. The "clicksound" should be
louder and more dramatic than the "movesound".
7. A few extras
If you want to minimize the the time for which the grey box displays
when the applet starts, you should use the "bgcolour" parameter. This
fills the applet with the specified colour until the graphics file
has been downloaded and the applet is ready to start. Note that the grey
box is actually created by the browser, not the applet, so there is no
way any java programmer can shorten the "grey-box period" further. The
grey box displays until the JVM has started and the applet itself has
downloaded. As the applet itself is about 12 KB (tiny), the real time factor
is actually your computer's memory and the quality of your internet
connection.
If you specify the "pressoff" parameter, the press-in effect on clicking
with the mouse will be deactivated. Remember that the press-in effect
doesn't just switch to a new button graphic - it also moves the text to
the right and downwards by one pixel. To reactivate the press-in effect
you must completely remove the "pressoff" parameter.
8. Further information and resources
There is a large troubleshooting FAQ on our site for all applet woes, which
we strongly recommend to you. The tips and tricks FAQ contains loads of
worthwhile information for setting up a good navigation system, and gives you
lots of free HTML and javascript code to fit around your applet. Remember that
we are constantly expanding this site and that extra button graphics resources
should be expected in the near future.
Our main site has a
special section ("tips and tricks") on how to integrate navigation applets
successfully into a web site. This page includes a lot of free HTML and
javascript. We will be adding more graphics resources to this site for
you to borrow - we don't know when, though. A new, advanced version of
this applet ("Magic Buttons Plus") is in preparation.